How to unroot Android
If you've gained root access to your device, we explain how to unroot Android and restore system defaults

Android is unquestionably the most popular mobile operating system in the world, and one aspect that makes it so desirable is the ability to unroot Android devices.

Android vs iOS: Which mobile OS is right for you?
Unrooting is the process of restoring an Android device to its default settings, usually involving a user acquiring superuser privileges and root access to their smartphone's operating system in order to make custom tweaks. Unrooting might be desirable if you plan to pass on a device to another user.
Rooting an Android device is possible due to its open source foundations. This makes the operating system highly adaptable, allowing users to tweak the system to fit their needs, or replace it entirely with a custom-built operating system, such as Lune OS, Pure OS, or Plasma Mobile.
How to unroot Android
As we're dealing with the operating system of a mobile device, the process of unrooting Android is fairly complex, and should only really be attempted by those with experience or those unconcerned about potentially breaking their device.
There are a variety of third-party tools available to help with the unrooting process, but we have highlighted three of the more popular methods below to get you started.
Disclaimer
Important: Before you begin, be sure to make a full backup of any data held on your Android device, as the unrooting process will wipe everything.
How to unroot Android using ES File Explorer

ES File Explorer is a popular data management tool, although very few users might be aware that it can also be used to unroot Android from a device entirely. While this is a free app, be wary of ads.
- Download the ES File tool from the Google Play Store.
- Once launched, you'll be shown a long list of functions the app can perform. Ignore these, and select the menu drop-down at the top left.
- Scroll down this menu until you see options with button sliders, some on and some off. One of these will be the Root Explorer option (off by default) - switch this on and it will ask for root privileges.
- Back on the main screen of the app, hit the box with the storage information at the top of the screen and locate the device's root folder - this will typically be in "system" | "bin". Find and delete both the "su" and "busybox" files.
- Now head back to the main screen, hit the storage info box again and this time look for the "app" folder. In here you want to delete a file labelled "superuser.apk".
- Once that's done, you can restart your device. Once it boots back up, your device should be unrooted and back to its original state.
How to unroot Android using Universal Unroot

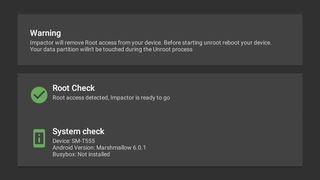
Another option you can try is the Impactor Universal Unroot app, which makes it possible to unroot your smartphone with one tap, at no cost:
- Download the app and launch it
- Select the Unroot option from the hamburger menu at the top left
- If your device is configured to allow for root access, you should see two green symbols
- Click the orange arrow at the bottom of the screen to start the process
Get the ITPro. daily newsletter
Receive our latest news, industry updates, featured resources and more. Sign up today to receive our FREE report on AI cyber crime & security - newly updated for 2024.
Dale Walker is the Managing Editor of ITPro, and its sibling sites CloudPro and ChannelPro. Dale has a keen interest in IT regulations, data protection, and cyber security. He spent a number of years reporting for ITPro from numerous domestic and international events, including IBM, Red Hat, Google, and has been a regular reporter for Microsoft's various yearly showcases, including Ignite.


