Meet the new Windows PowerToys
Originally an add-on for Windows 95, PowerToys are back for Windows 10. Here’s how you can use them to tweak Windows to suit your preferences and workflow

Old-school PC users will fondly remember PowerToys for Windows 95 and XP – a set of semi-official utilities that let you tweak operating system features and behaviours that weren’t normally customisable. Now, Windows 10 has its own set of PowerToys. There are currently just three toys available, compared to the 15 that launched for Windows 95, but the collection is growing over time – and rather than developing PowerToys as an in-house project, Microsoft is hosting them on GitHub and allowing third-party contributors to develop and contribute their own. Here’s our guide to the first tranche of Windows 10 PowerToys, with a look ahead to what’s coming soon.
Installing PowerToys
To run PowerToys, you’ll need to be using Windows 10 build 17134 or later. This was released back in early 2018, so as long as you’ve kept up to date with your patches, that shouldn’t be an issue. At the moment, PowerToys only supports Intel processors, but a revision for versions of Windows running on ARM is in development. Note that you’ll need a 64-bit version of the OS, too: recent posts in the PowerToys support forums suggest that there are no plans for 32-bit support.
If you’re ready to install PowerToys, you can download the installer here: look in the uppermost Assets section for the latest installer file. At the time of writing, the current version is called PowerToysSetup-0.16.1-x64.msi, although the version number may have gone up by the time you download it.
You can also install PowerToys from either the Command Prompt or PowerShell, using the Chocolatey package manager. Simply run the command “choco install powertoys” to fetch the code – and as new builds are released, you can upgrade with “choco upgrade powertoys”.
Once you’ve installed PowerToys, an icon will appear at the right of the taskbar (and then disappear into the hidden icons stack after a few seconds of idleness). Click it to open the PowerToys Settings UI, in which you can switch the individual PowerToys on and off.
FancyZones
Of the three currently available PowerToys, FancyZones is our favourite: the other two are useful utilities that you might use a few times a month, but for us this one is a daily must-have.
17 common Windows 10 problems and how to fix them How to switch from Windows 10 to Linux How to factory reset Windows 10
What does it do? Well, you’ll already know that holding down the Windows key while pressing the cursor keys causes your active window to snap to one edge of the screen, making it easy to organise multiple apps side by side. FancyZones takes this idea much further, underpinning the default layouts with a more finely grained grid, a range of preset arrangements and the option to create custom layouts to suit your needs.
Get the ITPro. daily newsletter
Receive our latest news, industry updates, featured resources and more. Sign up today to receive our FREE report on AI cyber crime & security - newly updated for 2024.
You can switch between five predefined layouts from the FancyZones overlay; the documentation claims that you can bring this up by pressing Windows+`, but this didn’t work for us. However, you can pick any key combination you like by opening FancyZones from the PowerTools sidebar, clicking in the “Configure the zone editor hotkey” box and pressing your chosen shortcut.
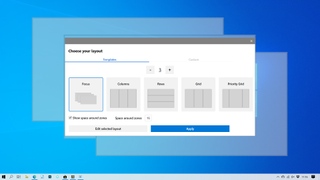
Once you’ve picked a layout, try holding down Shift and dragging a window around your screen: you’ll see multiple zones overlaid on your desktop, with each one highlighted as the mouse pointer reaches it. Dropping the window over a highlighted zone instantly resizes it to fill that region. If you prefer to use the keyboard, you can override Windows’ existing shortcuts for snapping apps by clicking the switch to activate “Override Windows Snap hotkeys to move windows between zones” in the FancyZones settings.
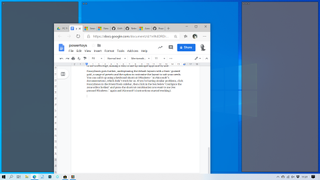
These predefined layouts make FancyZones useful straight out of the box, but it really comes into its own when you create your own layouts. To do this, click “Edit zones” and “Custom”, followed by “Edit selected layout” (at present, you won’t have any custom layouts configured so this will create a new one).
Now enter a name for your new layout: we’ve called ours “Writing and research”, as it’s intended for writing articles, but almost any task where you need to have multiple apps in view simultaneously can benefit from a custom configuration. Next, click the “Add new zone” button above and drag the edges of the grey frame that appears below the zone-editing dialog until it occupies the part of the screen you want to use. Then click “Add new zone” again and repeat the process to define the next snapping zone. Carry on until you’ve created your desired layout, remembering that you don’t have to use every available pixel. Nor do your zones have to be completely separate from one another: you can overlap sections if you want windows to sit in front of each other when in use.
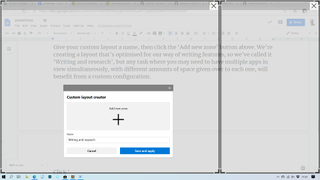
Finally, click “Save and apply”, and try Shift-dragging your windows around the screen again. As you can see from the screengrab to the left, our custom grid comprises a large window to the left and a smaller window to the right. The idea is to have a full-width word processor and a smaller browser window for reference, but if the mood takes us we’re free to switch them around – or to use a completely different pair of programs, such as Excel in the smaller window and Mahjong in the larger.
PowerRename
Using the Windows File Explorer to rename a folder full of files means clicking and typing a new name for each one in turn – a slow and tiresome process. The Command Prompt is much faster, letting you rename multiple files with a single command, but the syntax can be complex, and getting it wrong could have frustrating consequences.
PowerRename combines the efficiency of batch processing with a user-friendly front-end. To use it, you simply navigate to the folder that contains the files you want to rename, select the ones you want to work with, then right-click and select PowerRename from the context menu.
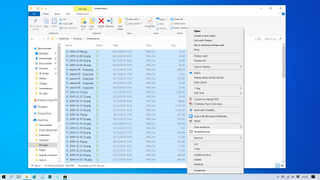
The PowerRename window will now open, prompting you to enter text in the “Search for” field, and specify what you want to replace it with in the “Replace” box. As an example, let’s consider a folder full of Windows screengrabs, which are automatically named with the date and time of their capture. If we want (for whatever reason) to make it look like all of the grabs we’d taken in December 2019 were actually captured in March 2020, we can search for “2019-12-” and replace it with “2020-03-”.
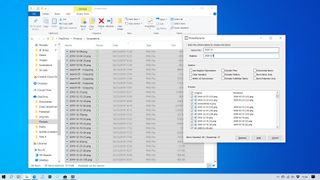
Just as if you were using the find and replace function in a word processor, the rest of each filename is left the same. And to reassure you that you’ve entered the right terms, PowerRename includes a terrifically helpful Preview pane, so you can see exactly what the effect of your input will be before you hit the Rename button.
That’s a powerful capability on its own, but it’s just the start of PowerRename’s potential. Let’s suppose we want to change the day as well as the month: if you just used the Search and Replace fields, you’d need to run the process 31 times to catch all the different dates. Thankfully, that’s not necessary as PowerRename also supports regular expressions, better known as “regex”.
Regular expressions are a sophisticated system of wildcards. You probably already know that the asterisk character, when used in a search term, matches everything – so searching for *.png will return all files with the appropriate extension. Regex takes this idea much further, with a wide range of operators to differentiate between letters, numbers and special characters, as well as specifying things such as maximum string lengths. This means you can use it to build complex search equations that precisely match specific criteria.
If you’re feeling daunted, don’t worry. As we’ve mentioned, the Preview pane takes the guesswork out of using wildcards – and you don’t need to master the whole regex system to take advantage of it. You can use as many or as few of the regex features as you want for each search.

The IT Pro Podcast: Farewell Windows 7
We reflect on the legacy of one of Microsoft's most enduringly popular operating systems
This is best illustrated with a couple of examples, starting with our idea of changing the day component of each filename. We can do this using the regex operator “\d”, which stands in for any single digit. First, we need to click the “Use Regular Expressions” and “Match All Occurences [sic]” boxes below the search and replace fields; then we can set our search term to “2019-12-\d\d”, and set the Replace text to (for example) “2020-03-01”. This will change the filename on every screenshot captured during December 2019 to indicate that it was in fact taken on 1 March 2020.
What if you wanted to replace the numerical month with the word “March”? In this case, you could search for “2019-\d\d-\d\d”, then put “1 March 2020” in the Replace box. And to include files created in November as well as December, you could use the syntax “[x|y]”, which means “either x or y”. Search for “2019-[11|12]-\d\d” and all files from either November or December 2019 will be returned.
Clearly, regex is a wildly powerful tool, with more potential than we can fully go into here. It’s something that’s well worth learning if you’re frequently going to use PowerRename – or the Windows Subsystem for Linux, which includes full support for regular expressions. As a starting point, check out the primer that Microsoft itself recommends at pcpro.link/307regex.
Shortcut Guide
After the powerful, practical potential of the first two PowerToys, the third may seem like something of a damp squib. Shortcut Guide brings up a desktop overlay when you hold down the Windows key for a second, showing a list of keyboard shortcuts you can use to access specific Windows functions – such as Windows+H for dictation, Windows+S for search and so on. Let go of the key and it instantly vanishes again.
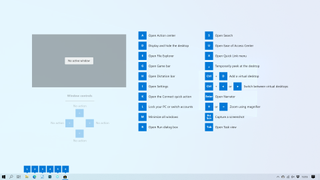
Shortcut Guide has no further function of its own, but if you’re the sort of person who likes to use Windows in the quickest and most efficient way, it’s a handy reference and could well introduce you to some speedy desktop shortcuts you never knew about.
Nik Rawlinson is a journalist with over 20 years of experience writing for and editing some of the UK’s biggest technology magazines. He spent seven years as editor of MacUser magazine and has written for titles as diverse as Good Housekeeping, Men's Fitness, and PC Pro.
Over the years Nik has written numerous reviews and guides for ITPro, particularly on Linux distros, Windows, and other operating systems. His expertise also includes best practices for cloud apps, communications systems, and migrating between software and services.


